
DIY Camping Stove: How to Make a DIY Camping Stove Step by Step (Budget-Friendly and Trail-Ready)
There’s a moment outdoors that feels almost like a reset button: your hands are cold, your stomach is loud, and the light is fading faster than you planned. Then you hear that first soft whoosh of a flame, and suddenly camp feels manageable again. If you’ve ever packed “just in case” gear and still wished you had one more layer of reliability, building a DIY camping stove is a small project that pays you back every time you need quick heat—whether you’re backpacking, car camping, or putting together an emergency kit.
This guide walks you through a DIY camping stove step by step using a classic soda-can alcohol stove design: lightweight, cheap, and surprisingly effective when you use it correctly.
Table of Contents
Safety First: Read This Before You Build or Burn
A homemade camping stove is still a real stove. Treat it that way.
Outdoor use only (seriously)
- Run your DIY camping stove outside or in very open airflow. Burning fuel creates gases you don’t want collecting around you. Organizations like the CDC warn that carbon monoxide can build up quickly in enclosed or poorly ventilated spaces.
- Never use it inside tents, cars, campers, or enclosed shelters.
Basic burn safety
- Set up on bare dirt, rock, or concrete—never dry grass or leaves.
- Keep a small bottle of water, sand, or dirt nearby in case you need to smother a flame.
- Alcohol flames can be hard to see in daylight. Assume it’s lit unless you’re 100% sure it’s out.
Check local regulations
Fire restrictions can apply even to stoves, especially wood-burning ones. Before your trip, check the current rules for your area (for example, USDA Forest Service, NPS, or local land management pages).
Choose Your DIY Camping Stove Type (Quick Comparison)
Not every DIY stove fits every trip. Here’s a quick way to choose what matches your style.
DIY Camping Stove Options (Table)
| DIY Camping Stove Type | Best For | Pros | Cons | Typical Fuel |
| Soda can alcohol stove | Backpacking, emergency backup | Very light, cheap, compact | Wind sensitive, mostly for boiling | Denatured alcohol / HEET (yellow) |
| Tin can “hobo” stove | Car camping, cooking over sticks | Fuel is easy to find | Sooty, often restricted in fire bans | Twigs/wood |
| Simple wood gas stove (DIY) | More efficient wood burning | Hot and efficient | More complex build | Twigs/pellets |
In this article, you’ll build the soda can alcohol version because it’s the most practical for a lightweight backup and easiest to make with basic tools.
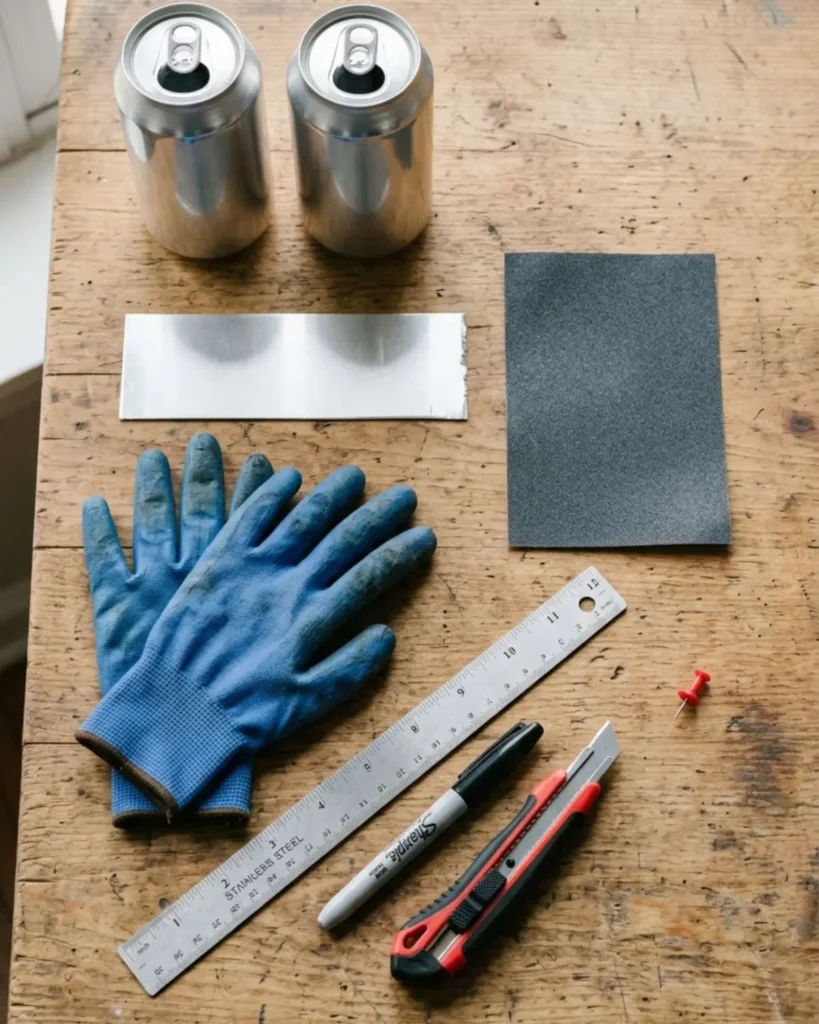
Materials & Tools Checklist (Soda Can DIY Camping Stove)
Materials
- 2 aluminum soda cans (standard size)
- Denatured alcohol (commonly sold as a solvent) or HEET (yellow bottle)
Use only fuels meant for clean burning—never gasoline. - Optional: a small amount of fiberglass insulation (or stove wick material) for a wick-style burn
- Optional: high-temp metal tape (helps reinforce seams)
- Optional: sandpaper or a nail file (for sharp edges)
Tools
- Utility knife/box cutter or sharp scissors
- Push pin/thumbtack or a tiny drill bit (for jet holes)
- Ruler/tape measure + marker
- Small block of wood (to support the can while cutting)
- Gloves + eye protection
Time: about 30–60 minutes your first time
Cost: often under $10 if you already have basic tools
DIY Camping Stove Step by Step (Soda Can Alcohol Stove)
This design works by heating alcohol inside the stove until it vaporizes and pushes out through small “jet” holes, creating a ring of flames.
Step 1: Clean and prep your cans
- Rinse both cans thoroughly.
- Let them dry fully.
- Remove sharp burrs or dents that could keep the stove from sealing well.
Why this matters
A clean, smooth fit helps the stove pressurize and burn evenly instead of sputtering.
Step 2: Measure and mark your cut lines
You’re making two “cups” that will slide together.
- On Can A, mark a line around the can about 1 to 1.5 inches up from the bottom.
- On Can B, mark another line around the can bottom at roughly the same height.
Don’t stress perfection—what you want is matching heights so the halves join neatly.
Step 3: Cut the can bottoms cleanly (avoid jagged edges)
- Put on gloves.
- Score lightly along your line with a utility knife (don’t try to cut through all at once).
- Rotate the can and keep scoring until it separates.
- Smooth edges with sandpaper or a nail file.
Safety note
Fresh-cut aluminum can be razor sharp. Treat every cut edge like it’s a blade.
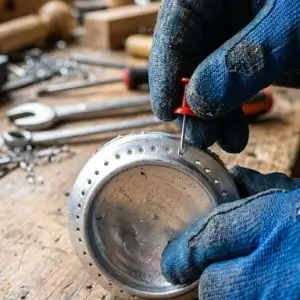
Step 4: Create the burner jets (the flame holes)
On the rim of one can bottom (this becomes your “top” piece), make evenly spaced holes near the outer edge.
- Use a push pin, tack, or tiny drill bit.
- Aim for 16–32 holes, spaced evenly.
- Keep hole sizes consistent so your flame doesn’t lean hard to one side.
Tip: Mark the spacing with a pen first (quick dots around the rim) so your jet ring looks uniform.
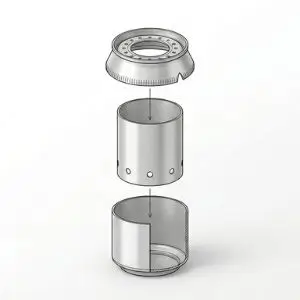
Step 5: Make the inner wall (the “chimney” ring)
From the leftover can body, cut a strip of aluminum:
- Roughly the same height as your stove halves (about 1–1.5 inches)
- Long enough to curl into a ring that fits inside the stove
Then:
- Curl it into a circle.
- Add small notches or tiny cuts along the bottom edge so fuel and vapor can move around it.
What it does: This inner wall helps heat travel and improves vaporization, which supports a steadier burn.
Step 6: Assemble the stove body
- Place the inner wall ring into the bottom half.
- Carefully press the top half over it.
If it feels too tight:
- Slightly crimp the edge of the bottom piece inward.
- Or trim a tiny amount off one half and re-sand.
If it feels too loose:
- Use a thin wrap of high-temp metal tape around the joint (optional).
Step 7 (Optional): Add wick material
If you want easier lighting and steadier performance in cooler weather, add a small amount of wick material inside the stove (not stuffed tight).
- Don’t pack it densely.
- Keep it away from blocking the jet holes.
How to Use Your DIY Camping Stove (Safely and Efficiently)
A soda can camping stove works best for boiling water and simple heat tasks. It can cook more than that, but you’ll want upgrades (like a simmer ring) for real “stove-top” meals.
First test burn (do this before your trip)
Pick a safe test spot outdoors:
- Bare dirt, rock, or concrete
- No overhead branches
- No dry grass nearby
Check for:
- Even flame around the jets
- No leaking fuel
- Stable base that doesn’t wobble
Lighting and cooking steps
- Set the stove on a flat, stable surface.
- Pour in a small amount of fuel (start modest—more isn’t always better).
- Light carefully from the side.
- Wait for the stove to “bloom” (jets ignite after the stove warms).
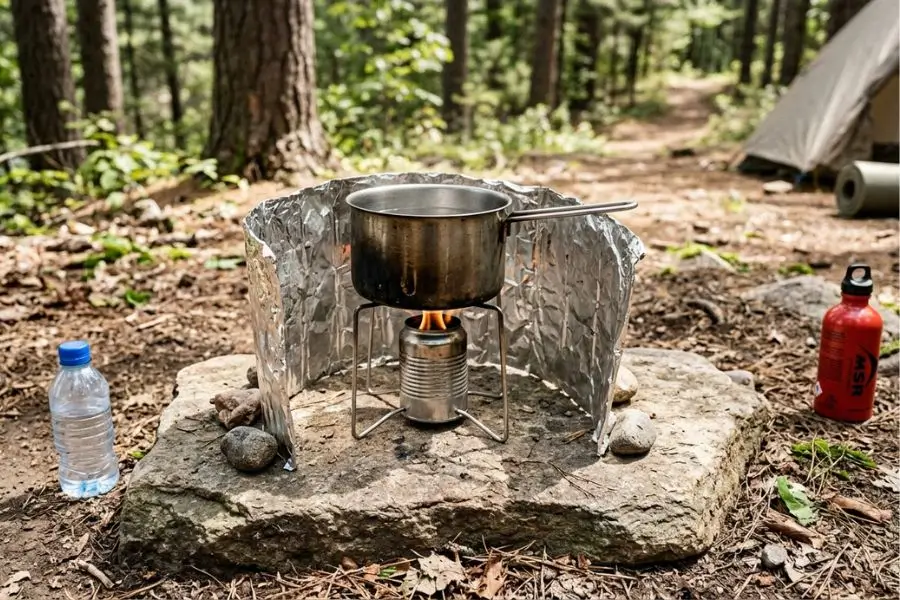
- Place your pot on a pot stand (recommended) rather than directly on the stove.
About pot stands
Putting a pot directly on the stove can choke airflow and reduce performance. A simple stand (even three tent stakes) improves oxygen flow and stability.
Wind Protection: The Difference Between Struggling and Succeeding
Wind is the #1 reason people think their homemade camping stove “doesn’t work.”
Use a windscreen—correctly
A simple foil windscreen helps a lot, but don’t seal the stove in a tight “oven.”
- Leave a gap so fresh air can feed the flame.
- Keep the windscreen far enough away that it doesn’t overheat the stove body.
Fuel Guide: What to Use (and What to Avoid)
Good fuel options for an alcohol DIY camping stove
- Denatured alcohol (common and effective)
- HEET yellow bottle (methanol-based fuel treatment)
Fuels you should NOT use
- Gasoline
- White gas
- Lighter fluid
- Random solvents you can’t identify
These are more volatile and significantly more dangerous in DIY stove designs.
Storage tips
- Use a clearly labeled fuel bottle with a tight cap.
- Keep it away from heat and direct sun.
- Pack it upright when you can.
Common Problems and Fixes (Troubleshooting)
The stove won’t “bloom”
Try this:
- Block wind (carefully) with a windscreen
- Warm the stove slightly (set it in the sun or warm hands—don’t preheat with dangerous methods)
- Check jet holes: uneven or clogged holes can prevent a proper jet ring
Weak flame or slow boil
- Your pot may be too large for the flame pattern
- You may be starving airflow (no pot stand, windscreen too tight)
- Your fuel may be low-quality or contaminated with water
Stove feels tippy
- Choose a flatter surface
- Use a wider pot stand footprint
- Don’t cook with a tall, narrow pot unless your base is very stable
Sooty pots or strong smell
Alcohol stoves are usually fairly clean. If you’re getting soot:
- Improve airflow
- Reduce wind disruption
- Switch to cleaner fuel
Simple Upgrades That Make Your DIY Camping Stove Better
Add an easy pot stand
Options:
- 3 tent stakes pushed into the ground in a triangle
- Hardware cloth formed into a ring
- A small metal trivet
Add a simmer ring (better control)
A simmer ring partially covers jets so you can reduce flame. This helps if you want to cook noodles, rice, or simple one-pot meals without scorching.
Pack, Store, and Maintain Your Stove
Quick packing checklist
- DIY camping stove (cool, dry)
- Fuel bottle (sealed and labeled)
- Windscreen
- Pot stand
- Lighter + backup matches
- Small repair tape (optional)
Maintenance
- Inspect seams for cracks
- Make sure jet holes are clear
- Re-sand any sharp edges that appear after dents or wear
Leave No Trace Tips (Cook Without Scarring the Site)
A small stove can still leave a mark if you’re careless.
- Cook on durable surfaces (rock, gravel, bare soil).
- Avoid fuel spills; pack out any contaminated materials.
- Follow Leave No Trace principles, especially in fragile alpine or desert environments.
Conclusion: A DIY Camping Stove That Earns Its Spot in Your Kit
When you build a DIY camping stove, you’re not just making gear—you’re making a backup plan you can trust. With careful cuts, evenly spaced jets, and a wind-smart setup, your soda can stove can reliably boil water, warm meals, and add real comfort to your camp routine. Test it at home, learn how it behaves in wind, and you’ll head out knowing you can make heat when it counts.
Call to action: If you build this stove, share your setup and what you cooked first—did you go straight for coffee, or did you try a full meal? Save this guide for your next trip, and consider making two stoves (one for your pack, one for your emergency kit)