
How to Make a Tarp Shelter: DIY Setups + Upcycled Camping Gear Tips for a Lighter, Cheaper Camp
You don’t need a brand-new tent to feel secure outside. What you need is a roof that stays up, sheds water, and lets you sleep without worrying about every gust of wind. If you’ve ever watched a forecast change at the last second—or heard rain start tapping the moment you finally got warm—you already understand why a tarp shelter is more than a “budget option.”
When you learn how to make a tarp shelter, you’re not just saving money. You’re building a skill you can use anywhere: on a quick overnight, during a road trip, or in an unexpected downpour. And when you pair that skill with upcycled camping gear tips, you’ll stretch what you already own into a kit that works hard without draining your wallet.
Table of Contents
Why Learn How to Make a Tarp Shelter (Instead of Buying More Gear)
A tarp shelter is simple on purpose. That simplicity is exactly why it works.
Here’s what you gain when you can pitch your own DIY tarp shelter:
- Flexibility: You can pitch high for airflow, low for storms, open for views, tight for wind.
- Lower weight and bulk: A tarp and cord pack down small compared to many tents.
- Budget control: You can start with a basic tarp and upgrade later.
- Repairability: Small rips, worn lines, and broken tie-outs can often be fixed in camp.
- Less waste: Reusing gear aligns with Leave No Trace values—buy less, bring less, discard less.
Practical note: Leave No Trace guidance also emphasizes choosing durable surfaces and avoiding damage to vegetation when you set up camp. Your shelter setup is part of your impact.
Tarp Shelter Basics: What You Need (Minimal vs. Comfort Kit)
You can keep this extremely simple. The goal is a stable pitch, not a complicated system.
Essential checklist
- Tarp (common sizes: 8×10, 10×10, 10×12)
- Cordage (one ridgeline + 4–8 guy lines)
- Stakes (or natural anchors like rocks/logs)
- Two supports (trees, trekking poles, paddles—whatever you have)
- Groundsheet (optional, but helps keep gear dry)
Nice-to-have upgrades
- Line tensioners (or learn an adjustable hitch)
- A few small carabiners (or soft shackles)
- Bug netting or a head net
- Mini repair kit (tape + needle/thread)
Tarp materials comparison table
| Tarp material | Pros | Cons | Best for |
| Poly tarp (hardware store) | Cheap, rugged, easy to find | Heavy, bulky, loud in wind | Car camping, backups, learning |
| Silnylon | Lightweight, packs small | Can sag when wet | Backpacking (if you don’t mind re-tensioning) |
| Silpoly | Less sag, good rain performance | Often pricier than poly | Wet climates, reliable pitch |
| Dyneema/DCF | Very light, doesn’t absorb water | Expensive; abrasion needs care | Ultralight setups |
Where to verify details: manufacturer specs and reputable outdoor retailers (for materials, weights, and care notes).
Safety + Site Selection: The Step That Saves Your Night
A great pitch won’t help if you put it in the wrong place.
How to pick a solid campsite for a tarp shelter
- Look up: Avoid dead branches (“widowmakers”) and unstable trees.
- Look down: Skip dips and channels where water collects. If the ground looks “scalloped,” it may drain right through your site.
- Check wind direction: Use shrubs, boulders, and terrain as windbreaks.
- Think runoff: You want water to flow around you, not toward you.
Quick weather habits that pay off
- Check a reliable forecast before you head out (in the U.S., NOAA/National Weather Service is a strong reference).
- If wind is expected, plan a low, tight pitch from the start—changing it later is harder in the dark.
Knots & Rigging 101 (So Your Shelter Stays Up)
You don’t need a “knot hobby.” You just need a few dependable tools.
Three knots worth learning
- Bowline: Creates a fixed loop that won’t slip.
- Trucker’s hitch: Gives you a tight ridgeline without fancy hardware.
- Taut-line hitch (or similar adjustable hitch): Lets you tension guylines easily.
Tip: If knots frustrate you, add line tensioners and learn knots gradually. You can still get a solid pitch while you build skill.
Two common ridgeline approaches
- Continuous ridgeline: One line between trees; you slide the tarp where you want it.
- Two-line ridgeline: A line from each end of the tarp to a tree; lighter and simple.
Tree-care note (important)
If your line is thin, it can bite into bark. Wrap the line around the tree a few times or use a strap to reduce damage—another Leave No Trace-friendly habit.
How to Make a Tarp Shelter: 5 Reliable Pitches You Can Use Anywhere
Below are five proven pitches. Start with the A-frame, then branch out.
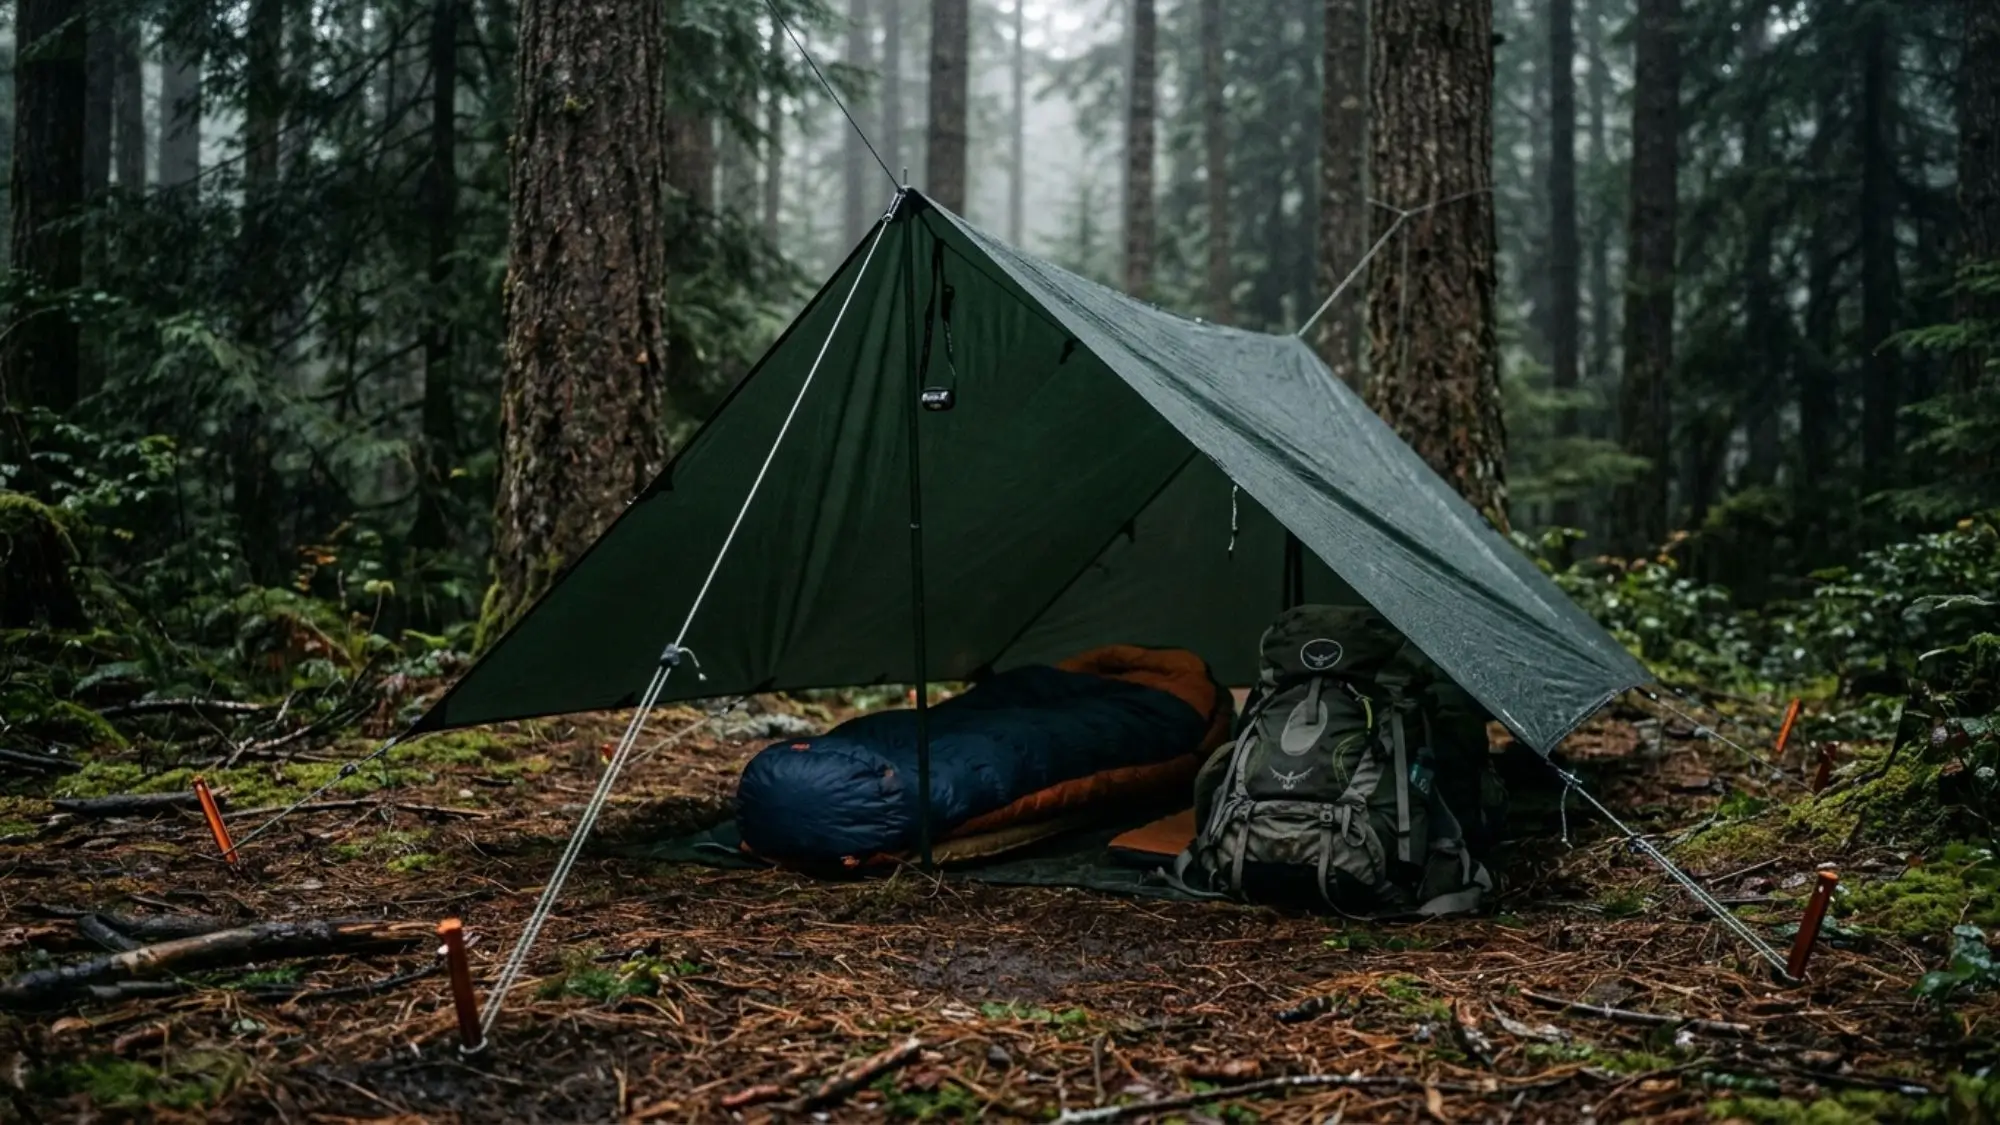
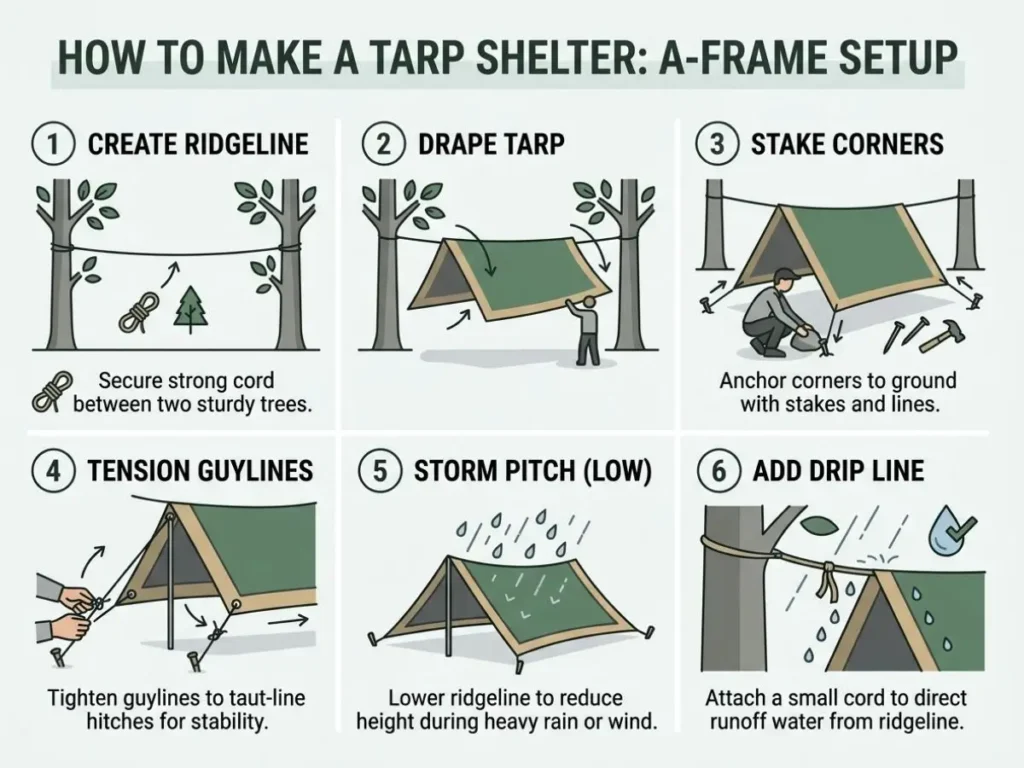
Pitch #1: A-Frame Tarp Shelter (classic, beginner-friendly)
Best for: steady rain coverage, versatile use, two people (with a bigger tarp)
Steps
- Run a ridgeline between two trees at about chest height.
- Drape the tarp evenly over the line.
- Stake out both long sides so the tarp forms a clean “A.”
- Tighten the ridgeline (trucker’s hitch helps), then adjust guylines.
Watch-outs
- Too high = more wind exposure.
- Too low = less airflow and more condensation.
Pitch #2: Lean-To Shelter (fast, open, great for breaks)
Best for: mild weather, quick setup, views
Steps
- Anchor one edge of the tarp low (stakes, rocks, logs).
- Raise the opposite edge using a ridgeline or two guylines to trees.
- Angle it so rain sheds away from your sleeping spot.
Watch-outs
- Wind can drive rain straight into the open side, so aim the “open face” away from the weather.
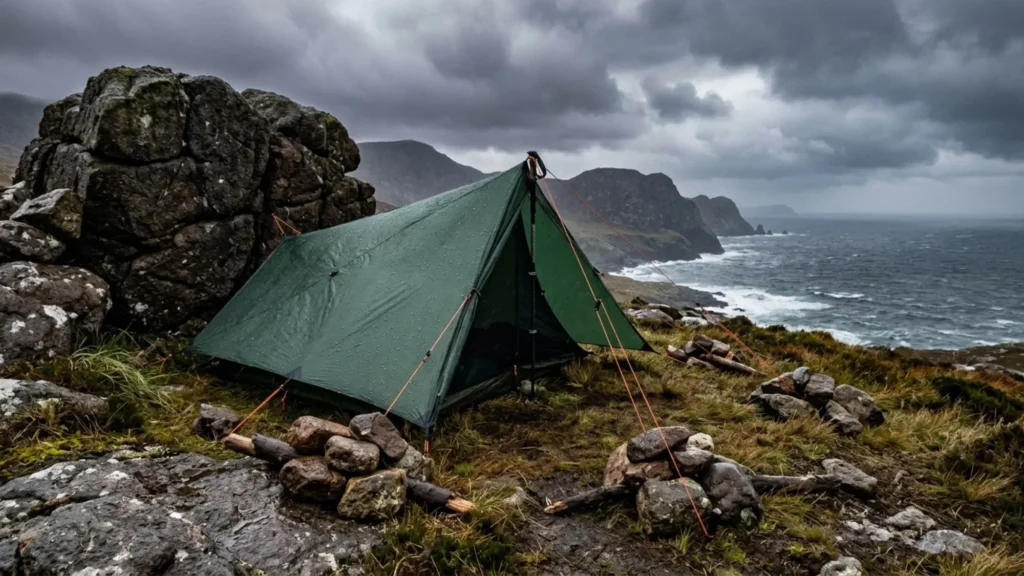
Pitch #3: Half Pyramid / Plow Point (storm-ready)
Best for: wind + rain when you want a tighter, tougher shape
Steps
- Stake one corner down as the “point.”
- Raise the opposite corner with a trekking pole or a line to a tree.
- Pull the remaining corners to form a wedge shape.
- Add extra guyline support if wind picks up.
Watch-outs
- Keep fabric panels tight; flapping stresses tie-outs.
Pitch #4: Diamond Fly (minimal coverage, quick pitch)
Best for: ultralight use, short trips, fair weather with surprise showers
Steps
- Suspend the tarp corner-to-corner (diagonal) along a ridgeline.
- Stake the remaining corners low to the ground.
- Fine-tune angles to block wind.
Watch-outs
- Coverage is smaller—pair it with a smart site and a good groundsheet.
Pitch #5: No-Trees Setup (poles, paddles, and creative anchors)
Best for: beaches, deserts, alpine areas, open fields
Steps
- Use trekking poles (or paddles) as supports—one-pole or two-pole styles both work.
- Stake corners securely.
- In sand or loose soil, use deadman anchors: bury a stick or bag filled with sand, attach your guyline, then pack sand on top.
Watch-outs
- In soft ground, longer stakes or buried anchors outperform short stakes every time.
Weatherproofing Your DIY Tarp Shelter (Rain, Wind, Cold, Bugs)
Rain: keep water moving away from you
- Pitch one side lower so water sheds fast.
- Add a drip line on the ridgeline (a small cord tied below the tarp line) to stop water from running into your shelter.
- Make the entry small in storm mode—think “roof first, door second.”
Wind: reduce flapping and stress
- Aim the lowest edge into the wind.
- Add extra guylines to midpoints if your tarp has loops.
- Use natural windbreaks, but avoid setting up under dead branches.
Condensation: manage airflow
Tarps breathe better than many tents, but condensation can still happen in damp air.
- Raise the leeward side slightly for ventilation.
- Avoid camping directly over wet ground if you can.
Bugs: solve it without buying a new shelter
- Hang a simple bug net under your ridgeline.
- Use a head net if insects are intense.
- Tuck netting edges under your sleeping pad to reduce gaps.
Upcycled Camping Gear Tips: Turn “Old Stuff” Into Reliable Shelter Add-Ons
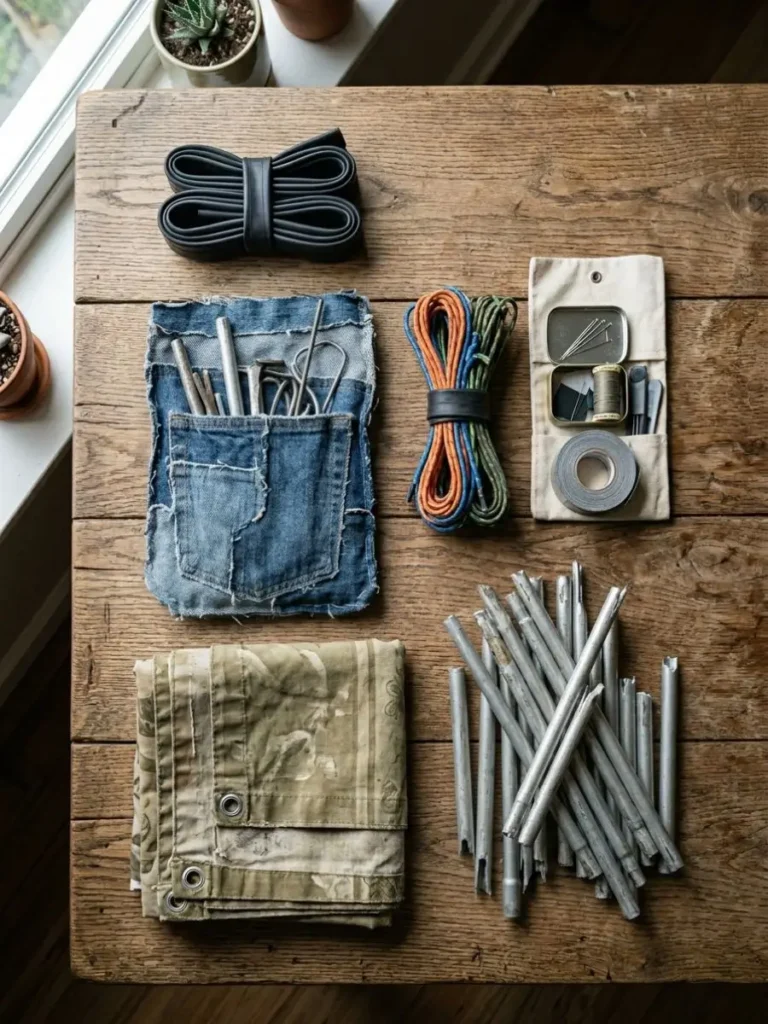
Upcycling works best when you focus on simple, tough items that handle dirt, moisture, and abrasion.
Easy upcycles that actually help
- Old jeans or canvas: sew or tape into stake bags or abrasion patches.
- Bicycle inner tube: cut into rubber loops for tensioning guylines or gripping poles.
- Retired cord/rope (inspected): turn into guylines or ridgeline backups.
- Shower curtain: use as an inexpensive groundsheet (great for car camping).
- Broken tent pole sections: repurpose as splints, short tarp props, or repair sleeves.
Reinforce tarp tie-outs (without fancy hardware)
- Add webbing scraps as tie-out “wings” using strong stitching or appropriate adhesive/tape.
- Learn the pebble-and-loop method: place a small rock/pebble in the tarp fabric, wrap a loop of cord around it, and tension from the loop—useful if you lack grommets.
What not to upcycle for safety
- Cracked carabiners or worn climbing gear for load-bearing use.
- Moldy fabrics near your sleeping setup (it’s not worth the health risk).
Maintenance, Packing, and Practice (So It Works When You Need It)
Practice checklist (do this at home first)
- Pitch your shelter once in calm weather, once in wind.
- Time your setup so you can do it before it gets dark.
- Test your “storm mode” pitch with extra guylines.
Care basics
- Dry your tarp before long-term storage to prevent mildew.
- Check tie-outs and lines for fraying.
- Store cordage untangled (a simple wrap saves you time later).
FAQ: How to Make a Tarp Shelter (Common Questions)
How to make a tarp shelter if you’ve never tied knots before?
Start with a ridgeline and two guylines. Use line tensioners if you have them, and learn one knot at a time—bowline + trucker’s hitch will cover most setups.
How to make a tarp shelter in the rain without soaking your gear?
Pitch the tarp first as a roof, then move your pack and sleep system underneath. Keep your stakes and guylines accessible in an outer pocket so you’re not digging around in the wet.
How to make a tarp shelter without trees?
Use trekking poles, paddles, a bicycle, or even sturdy sticks. In sand or loose soil, switch from stakes to deadman anchors (buried sticks or filled bags).
How big should your tarp be for two people?
A 10×10 or 10×12 is a common starting point. If you expect frequent storms, size up to gain coverage for gear and cooking space.
Is a DIY tarp shelter safe in heavy wind?
It can be—if you choose a protected site, pitch low, add extra guylines, and build solid anchors. If conditions are severe, avoid exposed ridges and lone tall trees.
Conclusion: Your Best Outdoor Upgrade Is Skill, Not Shopping
Once you know how to make a tarp shelter, you stop relying on perfect conditions and expensive gear. You can adapt to wind shifts, surprise rain, or a cramped campsite—and you can do it with a kit built from smart basics and a little creativity.